RIO 2000 Ceramic Water Filter Operating and Exchange Instructions
Introduction
Follow the simple instructions given below and your filter will supply you with safe, clean drinking water for many years.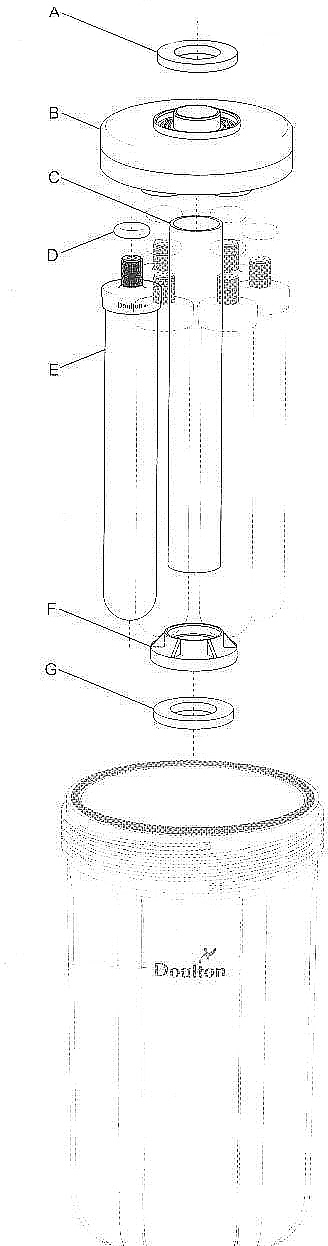
1. Installation Conditions
For use with COLD water only.
Maximum Service Flow: 2000 Litres/Hour.
Maximum Working Pressure: 100psig (689kPa).
2. Cartridge Assembly
Take the manifold assembly (B) and ensure that the rubber seal (A) is correctly located into the recess. Push the support tube (C) securely into the central recess on the underside of the manifold. Remove each of the six filter candles (E) from its protective wrap and check that the o-ring seal (D) is located fully onto the threaded spigot. Screw the thread spigot into one of the holes in the underside of the manifold until washer resistance is felt and the moulded cap just touches the ring on the underside of the manifold (B). Do not over tighten. Repeat for all six filter candles. Take the base moulding (F), ensure that the rubber seal (G) is located correctly into the recess and push the base securely onto the support tube (C) to complete the assembly.
3. Installation/Replacement
General removal and re-installation of the cartridge assembly is carried out as follows:
3.1. Isolate the water supply to the filter, vent any pressure and unscrew the filter body. Care should be taken, as it will be full of water.
3.2. The cartridge assembly can now be removed, taking care at all times not to contaminate the inside of the unit, and replaced or cleaned as described below.
3.3. To re-fit the cartridge assembly, ensure that the cartridge assembly is fitted into the sump of the filter with the manifold uppermost.
3.4. Screw the sump gently into the filter head, ensuring that the manifold locates correctly into the head and tighten until a seal is made. Do not over-tighten.
4. Conditioning the filter elements
In order to remove any loose particles resulting from manufacture of the filter elements, the water from the filter should be allowed to run to waste for 10 minutes. Allow the filter to stand for 24 hours to condition the filter to the source water and then flush for a further 10 minutes to waste. After carrying out this procedure, the filter is now ready for use.
5. General Use
The filtered water can now be used for drinking and preparing food. If the filter has been standing unused for more than 3 days, it is recommended that water be run to waste for 1 minute before use.
6. Cleaning the filter elements
Due to filtration of particulate contaminants from the water during use, the flow of water from the filter may reduce over a period of time. To return the water flow to its normal level simply remove, clean and re-fit the cartridge assembly as follows: Remove the cartridge assembly as described in section 3.
Take the assembly to the sink and stand it upright on the base moulding (F/G). Loop the cleaning brush (supplied with the filter) under one of the six ceramic candles, hold under running water and slide the brush up and down until the ceramic is clean. Repeat the cleaning operation on all six ceramic candles, taking care at all times not to contaminate the inside of the unit. Alternatively, each of the six filter candles can be removed and cleaned individually. The cartridge assembly is now ready to re-fit as described in section 3. Wash hands thoroughly after cleaning the filter.
Should you have difficulty or questions about the installations please do not hesitate to call us at (toll free) 1 888-664-3336 in US, +1 248-258-5500 all other regions or email us at: info@doultonusa.com
Thank you for purchasing Doulton water filter and enjoy pure water for years to come as millions of individuals enjoying it in over 150 countries worldwide.
Doulton, making the world's water safe to drink since 1827. The early innovation associated
with the Doulton name has continued well into the twenty first
century with an increasingly sophisticated range of water
filtration products being developed to meet the needs of modern
water purification systems. Today, Doulton is acknowledged
world leader in water purification, with over a million systems
sold each year in over 150 countries.
Whole House Water Filtration/Conditioning Systems
Home Water Filters
Commercial Kitchens Equipment
Industrial Water Purification Systems
Portable Gravity Units
Boats/RV Fresh Water Systems
Other Doulton Ceramic Filter Applications
Water Filter Replacement Ceramic Cartridges/Candles
ALL PRODUCTS LIST
| 