World class ceramic water filters |
|
Instructions Manuals Specifications >> Countertop water filters installation |
||||||||||||||||
Doulton Countertop water filters CP100 and 200+ Series Installation InstructionsNow that you have bought a Doulton drinking water filter you have taken the first step towards protecting you and or your family from the dangers water-borne contaminants.
Water Filter System Tested and certified by NSF International against NSF/ANSI Standard 42 for the reduction of: Chlorine (Taste & Odor); Particulates, class1, and Standard 53 for the reduction of: Turbidity; Cysts (including Giardia and live cryptosporidium) and Lead. Water Filter Systems Certified for Cyst Reduction may be used on disinfected water that may contain filterable Cysts. The substances removed by this filtering device are not necessarily in your water. Note: It is important that local laws and regulations are observed and that all types of fittings comply with such regulations. Ultracarb CN-UC is the most common ceramic filter used in these systems:
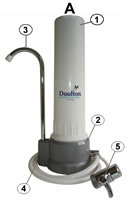
1. Installation1.1 Selecting a position for the Water FilterThe CP100 and 200 Series water filter system is designed to be free standing on a sink unit, or adjacent counter top. PLEASE NOTE: THIS UNIT IS FOR COLD WATER USE ONLY. Warm water can damage the supply tubing. 1.2 Connecting Diverter Valve and FittingsPLEASE NOTE: These units do not work and can not connect to faucets which have a pull-out sprayer coming from the faucet spout and uncommon threaded faucet types. Remove the aerator from your faucet spout by turning aerator in a counter-clockwise direction. Normally this is done by hand but you can use pliers if need be. Save the aerator in case you move the unit to another location. Screw the diverter valve (5) directly on to the cold water tap or mixer tap if a male (EXTERNAL) thread is visible. If a male (external thread) is not visible, a supplied faucet adapter will be required to screw onto the faucet, followed by the diverter valve, which screws on to the adapter. 1.3 Fitting the Ceramic ElementUnscrew the filter housing canister (1) from the base (2). Remove the ceramic filter candle from its protective sleeve and screw into the base (2) until the candle’s washer resistance is felt. DO NOT over-tighten. Make sure the pre-moistened housing O-ring is securely placed inside the canister’s groove slot and screw the threaded canister (1) into the base (2). Hand-tighten only. 2. Conditioning the Water FilterThe water filter unit should now be ready for the first filling with water. To avoid any problems caused by air locks in the filter housing, the unit should be held upside down in the kitchen sink. Turn on the cold water tap partially, then operate the knob on the diverter valve (5) to allow water to slowly fill the filter unit for the first time. It will take time for water to dispense through the spout (3). Allow the water to run to waste for 5 minutes. After roughly 2-3 minutes of holding unit upside down draining in sink, set the unit on the sink top and let it flush for an additional 5 minutes. Do not drop. Turn off water to the filter and allow the filter to stand unused overnight or for 24 hours to condition the filter to the source water and then flush water through it again for an additional 5 minutes. After carrying out this procedure, Your CP Series water filter is now ready for use. 3. Servicing your CP Series water FilterDuring use, contaminants filtered from the water may build up on the outer surface of the ceramic cartridge and cause a significant FLOW REDUCTION through the unit. The ceramic filter candle, located in canister (A) will, therefore need cleaning to restore the flow. Cleaning frequency will be dependent upon the condition of the incoming water. Cleaning, removal and replacement of the ceramic water filter cartridge is carried out as follows:With the cold water tap turned off, hold the water filter unit over the sink. Unscrew the housing canister (1), which will be full of water, from the base (2). The ceramic filter candle, located in “A”, can now be unscrewed from the base (2) and cleaned under cool running water with a scouring pad (3M ScotchBrite works well) or stiff nylon brush. Never use steel wool or detergents. Use sensible hygiene procedures such as gloves and handle the candle as any fragile item. IT IS IMPORTANT to wash your hands thoroughly after servicing the candle. Cleaning/Sterilizing the water filter housing (canisters):The filter housing can be washed with dishwashing soaps followed by a thorough rinse. To clean or sterilize the water filter housing, the following should be avoided: A. Strong oxidizing agents such as bleach or Milton solution. B. All strongly acidic materials including some descalents. C. Strongly alkaline materials. A filter candle that has reached the end of its life would be indicated by a reduction in the quality of the filtered water with respect to taste. The candle(s) should be replaced in accordance with the rated service capacity, which would typically give a period of six months usage. After a new filter candle has been reinstalled, recondition the filter as described in 2.0. It is important to wash your hands thoroughly after servicing the water filter. Doulton Countertop water filters CP100 and 200+ Series Installation Instructions in PDF Water Filter Parts and Service Availability:Should you have difficulty or questions about the installation or are in need of replacement filters, please do not hesitate to contact us. Cleaning ceramic water filter VIDEO>> CAUTION: Should the candle have been accidentally dropped and did not break do not put it into the filter, there may be invisible crack which can affect microbiological filtration effectiveness. Leave the candle in open space and let it dry for at least 24 hours. Fill a container with water, hold the nozzle in your four fingers covering it with your thumb then submerge the candle and observe for air bubbles. Should you see air bubbles discard it. Thank you for purchasing Doulton water purifier and enjoy pure water for years to come as millions of individuals enjoying it in over 150 countries worldwide. |
Other Instructions& Specifications
Doulton ceramic filtration elements |
||||||||||||||||
Countertop water purifiers Under the sink filters Whole House Water Filtration/Conditioning Systems Shower Filter Commercial Kitchens Equipment Industrial Grade Water Purification Systems Portable Gravity Fed Units Boats/RV's Fresh Water Systems Filter Replacement Ceramic Candles and Cartridges Lead Free Water Filter Faucets WHY CHOOSE A CERAMIC WATER FILTER ALL PRODUCTS LIST
|
|||||||||||||||||