World class ceramic water filters
Instructions Manuals Specifications >> Undersink Water Filter Installation Instructions
Now that you have bought a Doulton drinking inline water purifier you have taken the first step towards protecting you and or your family from the dangers water-borne contaminants.
IP100, 200, 300, IS100 & ISVR100 Models Installation Instructions Using EZ Fitting>>
IP100, 200, 300 & HIS Installation Instructions Using SV7 Piercing Valve

1. Unscrew the sump from the head. REMOVE THE CARTRIDGE FROM ITS PROTECTIVE SLEEVE.
2. Place the sealing washer onto the threaded nipple and screw into the head until washer resistance is felt. DO NOT OVER TIGHTEN.
3. Apply food grade Vaseline or vegetable oil on the ‘O’ ring then place it into the groove in the body and screw the threaded body into the head. HAND TIGHTEN ONLY.
4. Choose appropriate length of tubing, one for the raw water supply one for the purified water supply.
5. Faucet installation: On stainless steel sink; drill 1/2 inch hole on the ledge of the sink using steel hole saw (available at the local hardware store) or steel drill bit. On porcelain steel sink; drill 1/8 inch pilot hole with a steel drill bit, finish drilling with 1/2 inch bit at a low speed. On cast iron sink drill 1/8 inch hole using carbide tip bit followed by 1/4 inch and 1/2 inch final at low speed. Apply masking tape onto the area you are drilling on porcelain and cast steel sinks to avoid enamel chipping and bit "traveling". For vitreous china sinks contact your local plumber or plumbing supply for further instructions.
 6.
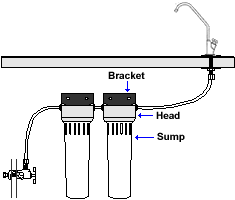
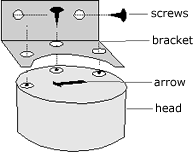
Install purifier bracket using 2 large screw on a convenient position
and line up the purifier on the sink base cabinet wall. Screw in 2 small
screws onto the wall of the cabinet half way through.
![]()
 7.
Install piercing valve on a straight part of the cold water supply using
the spacer for 3/8 or 1/2 inch copper pipe. Hand tighten the valve support
screw then half turn by pliers.
8. Insert tubing into valve speed fitting and into the purifier on back of the arrow approximately 3/4 of an inch. Insert 2nd tubing in front of the purifier arrow to the faucet.
9. Turn valve wings clockwise until it completely stops, then 1/4 turn with pliers.
10. Open Pure Water Tap and back seat valve wings all the way. Let the initial water flow to waste approximately 2-3 minutes.
SERVICING THE WATER PURIFIER

 The
flow rate of the ceramic filter can be easily renewed by simply brushing
its outer surface with a plastic brush or soft scouring pad under running
water. As the top layer of ceramic and the contaminants are brushed off
and flushed away, a new layer becomes available. With the Sterasyl candle
this process can be repeated over and over before the ceramic material
is exhausted. Supersterasyl, Ultracarb and Supercarb candles should be
changed every 6-9 months as their carbon media will get exhausted sooner
than the ceramic.
If filter has not been used for period of two days or longer the first 2 qt./litres should be wasted and let fresh water supply into the filter.
- Carefully remove candle from the unit and handle it as any fragile ceramic.
- Using a plastic brush or soft scouring pad (3M Scotch-Bite® or similar), scrub the filter under running water or in a bowl of water. Always brush away from threaded mount, taking care not to contaminate the mount. Never use soap, detergents nor steel wool.
- Be sure that sealing washer is properly seated before reinstalling it.
If you accidentally drop the candle and did not brake to ensure the integrity do the following test.
- Submerge it into water while holding a finger over the outlet to keep the air inside.
- If there is a crack the trapped air would exit through it and you would see bubbles rising from the ceramic.
- When not using for long period of time remove, air dried for at least 24 hours and store candle in dry place.
Suggestions: Wear rubber gloves when cleaning. Cover the threaded mount with plastic and a rubber band or the candle O ring.
Should you have further problem please give us a call at: (Toll free in US) 1.888.664.3336 or +1.248.258.5500